The security of your server is highly dependent on the person that manage the server as our servers are delivered with full admin permission. Due to privacy policy, we do not monitor/manage your server unless specifically allowed by customers so it’s not possible for us to know what’s going on in your server, what software you’ve installed, what files you’ve opened, etc. We can only recommend the best practices as following.
Step 1: Regain access and re-setup server
Step 1.1 Reset your server password
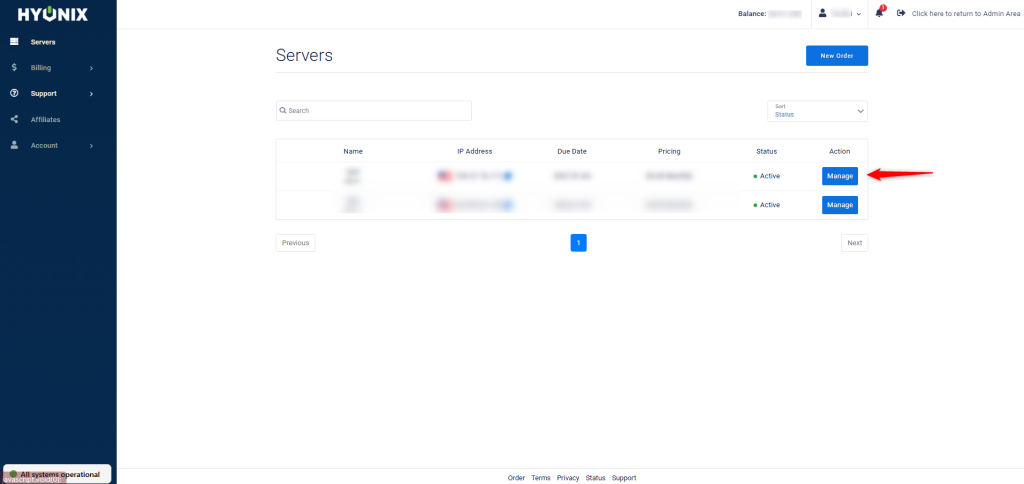
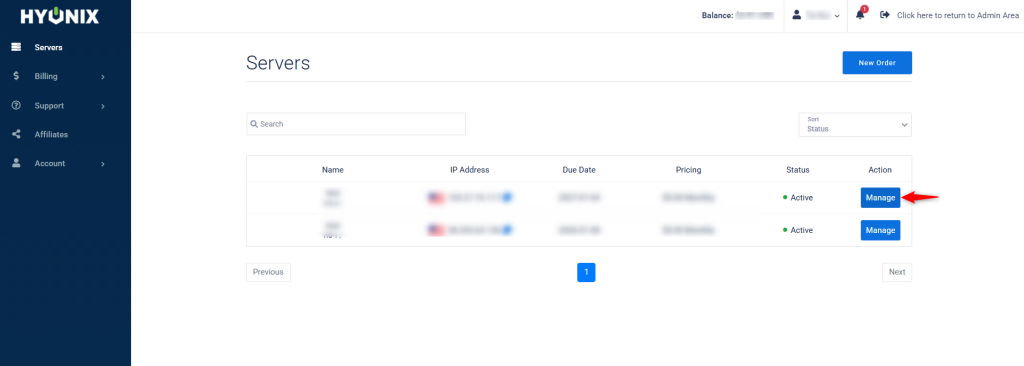
1. Log into the Hyonix Portal using https://my.hyonix.com.
2. Once you are logged in, navigate to the Server Control Panel by clicking Manage button of the server you want to reset password.
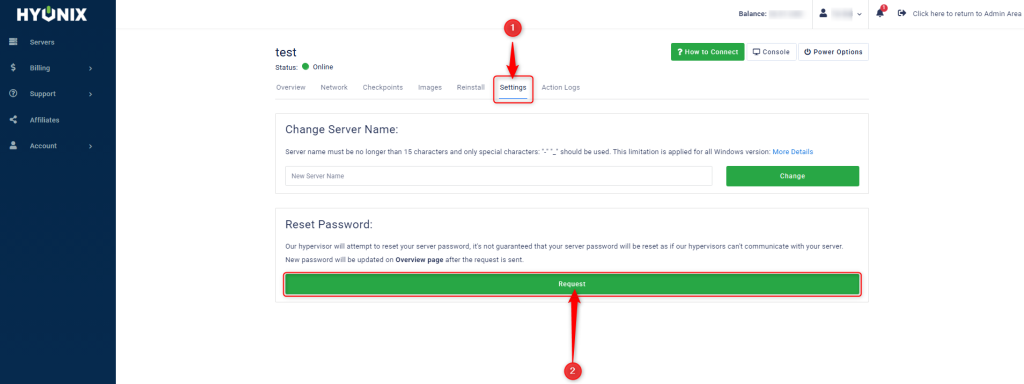
3. Next, navigate to the Settings tab. Then under Reset Password click on Request to reset the VPS password.
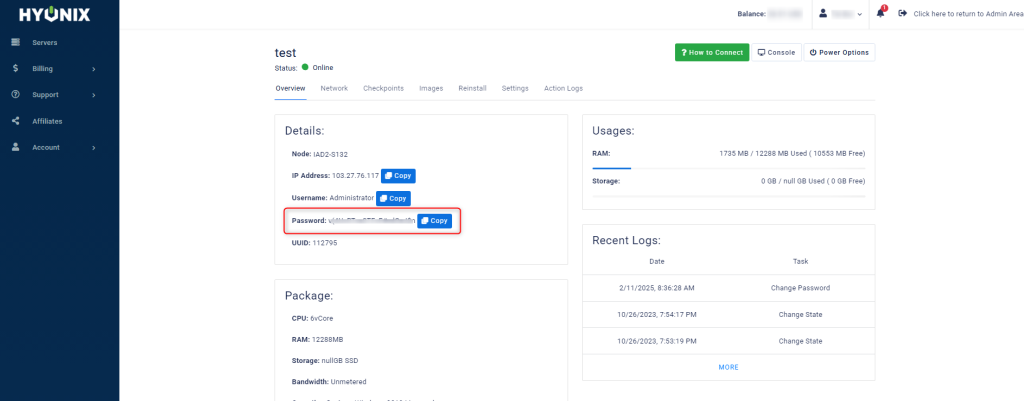
4. Lastly, navigate back to the Overview to check the new password.
If you want to track/check the IPs that logged in your server, please follow this tutorial: http://woshub.com/rdp-connection-logs-forensics-windows/
Step 1.2: Backup your data
Please backup your data and follow step 1.3 to reinstall your server for a fresh start (reinstall will delete all data and set your server back to the beginning)
Step 1.3: Reinstall your server
- Reinstalling your server will power it down and overwrite its disk with the operating system you select. All data on the disk will be lost!,
1. Select the Manage button icon of the server you’d like to re-install.
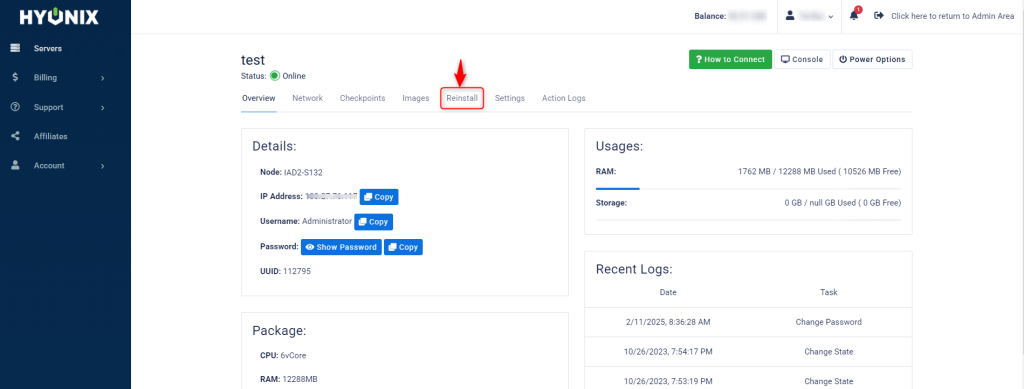
2. Next, navigate to the Reinstall page.
3. Once you reach this page, select an operating system from the Available Operating Systems drop-down menu. Then, select the Reinstall button.
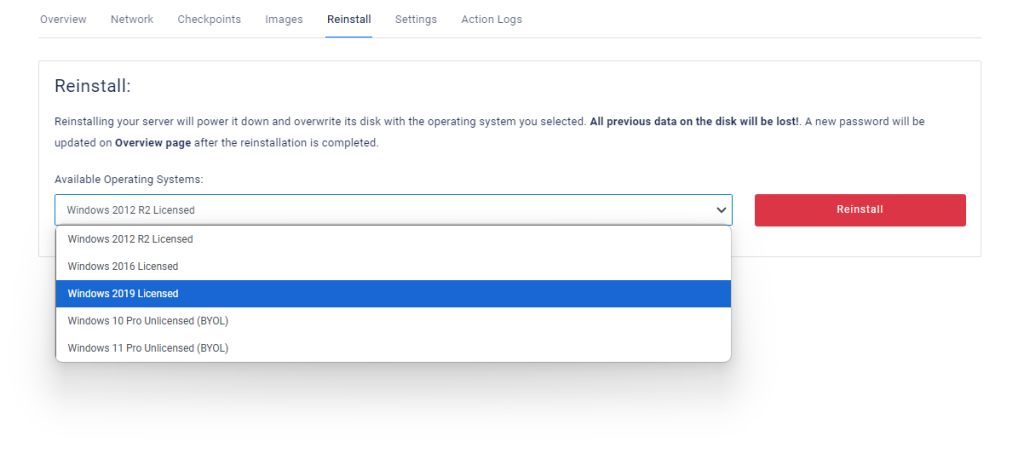
4. Next, a confirmation screen will pop up. If you are okay with the warning message, select Reinstall to begin the reinstallation.

5. Once the reinstallation is complete, a new password will be updated on the Overview page. You have successfully completed a re-install of the Windows VPS via the Hyonix portal.
Step 1.4: Reinstall your app
You can re-download/reinstall your app that you have backed up from step 1.2 to the new server
Step 2: Secure your new server
Step 2.1: Change RDP port
To strengthen security and majorly reduce the hacking attempt, we can change the RDP default port from default to a different port. In this article, you will learn how to change the remote desktop RDP port.
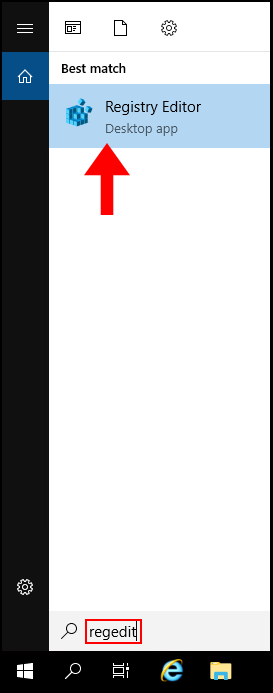
1. To start off, log in to your Windows VPS then search and open regedit.
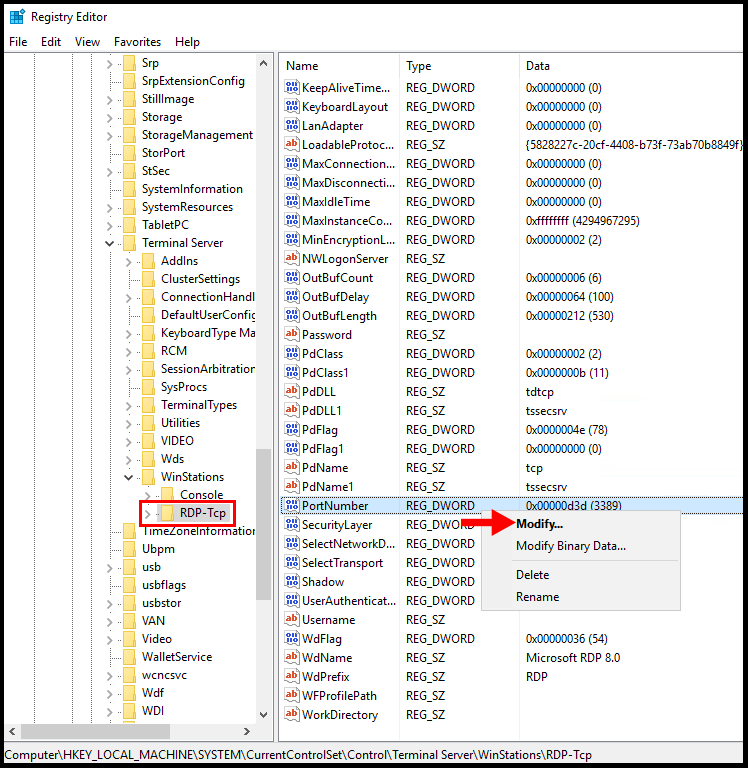
2. Once the Registry Editor window is open, navigate through the following folders from the left menu. HKEY_LOCAL_MACHINE → SYSTEM → CurrentControlSet → Control → Terminal Server → WinStations→ RDP-Tcp.
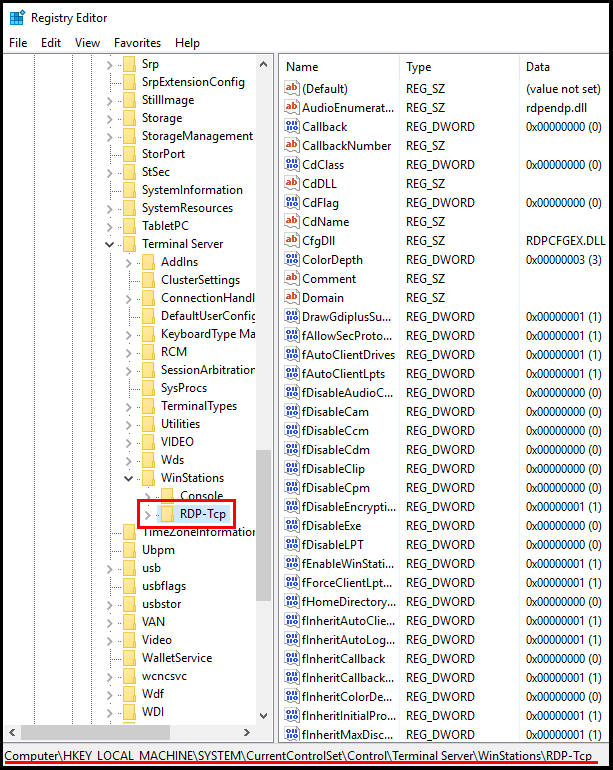
3. Now, on the right-hand side locate and right-click PortNumber then click Modify.
4. A pop-up will then appear, click Decimal and enter a new port under Value data.
Make sure to keep the port number noted somewhere as you will need this to connect to the server moving forward.
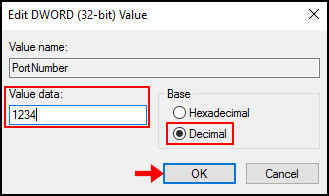
You can use a port number between 1025 and 65535; which is not currently used.
Adding Inbound Rule for Custom Port
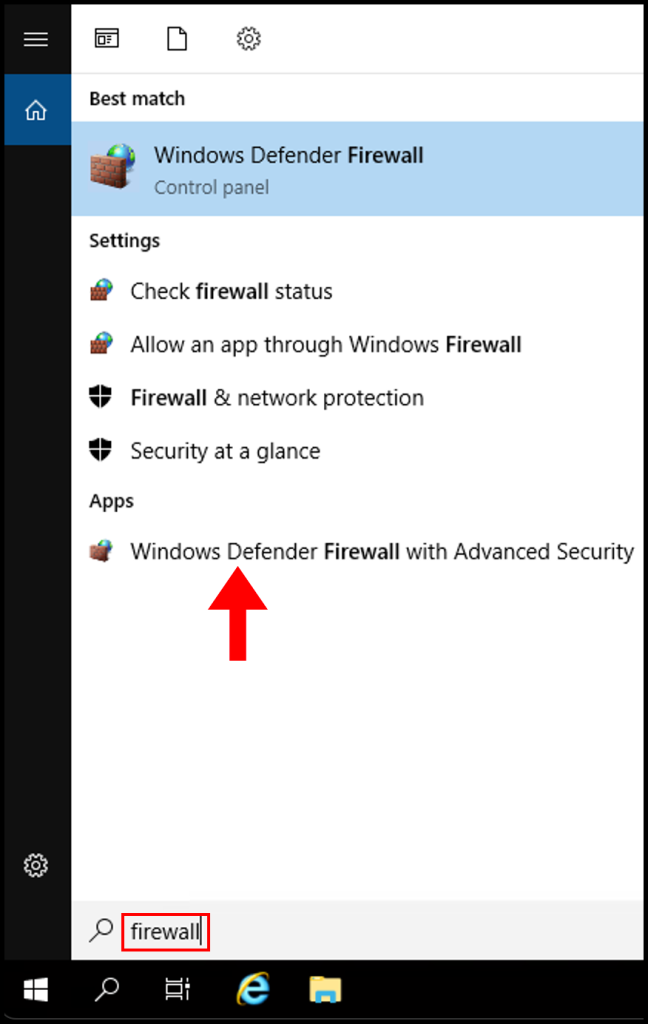
Once we configure the Port within Registry Editor, now we need to add the custom port in Firewall to make it work. To do that, follow the below steps:
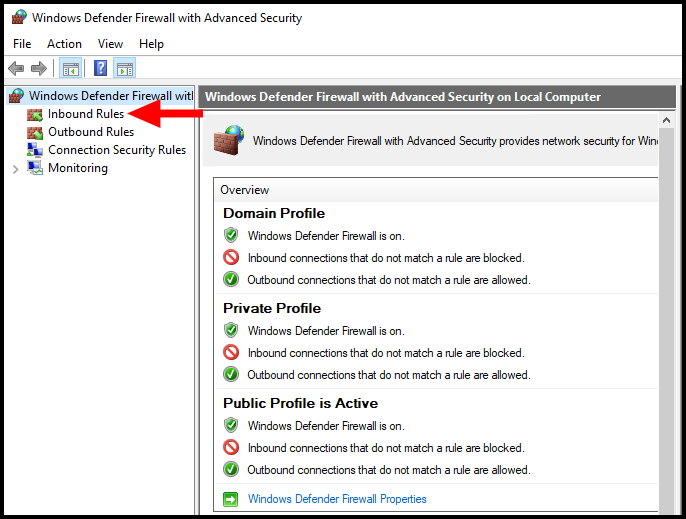
1. On your Windows server, search and open Windows Firewall with Advanced Security.
2. Navigate to Inbound Rules on the left menu.
3. Then click New Rule from the menu on the right side.

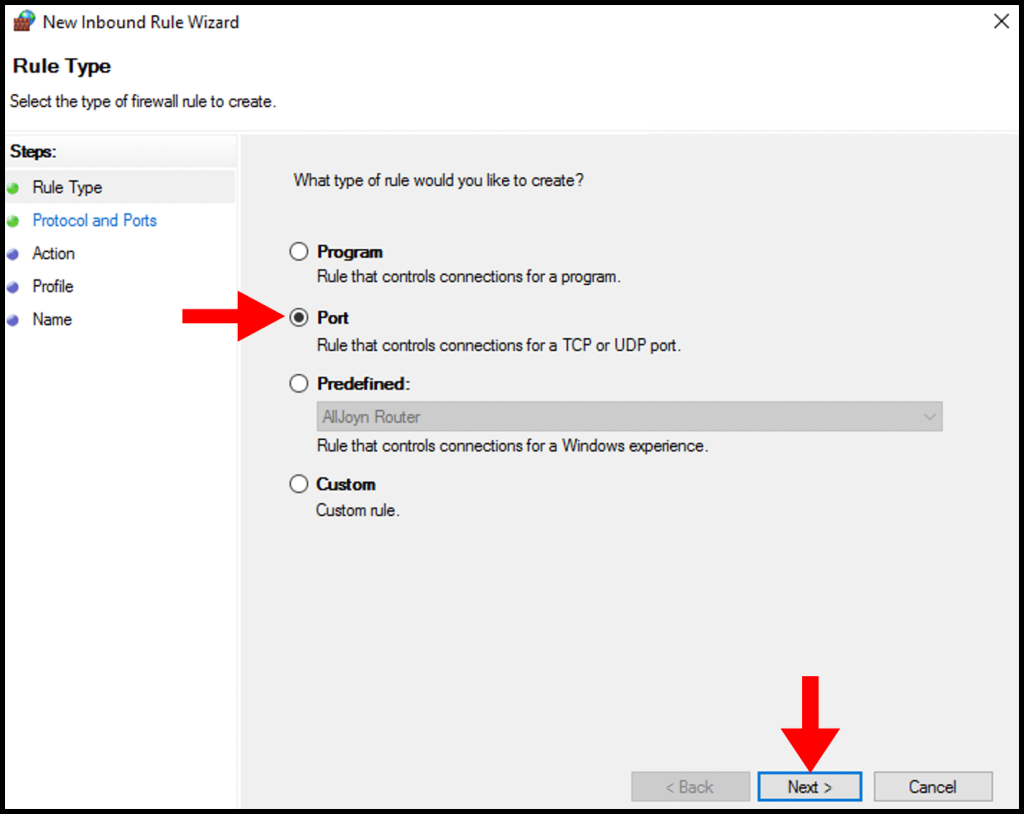
4. On the Rule Type section, click the circle to select Port. Once done, click Next to move on.
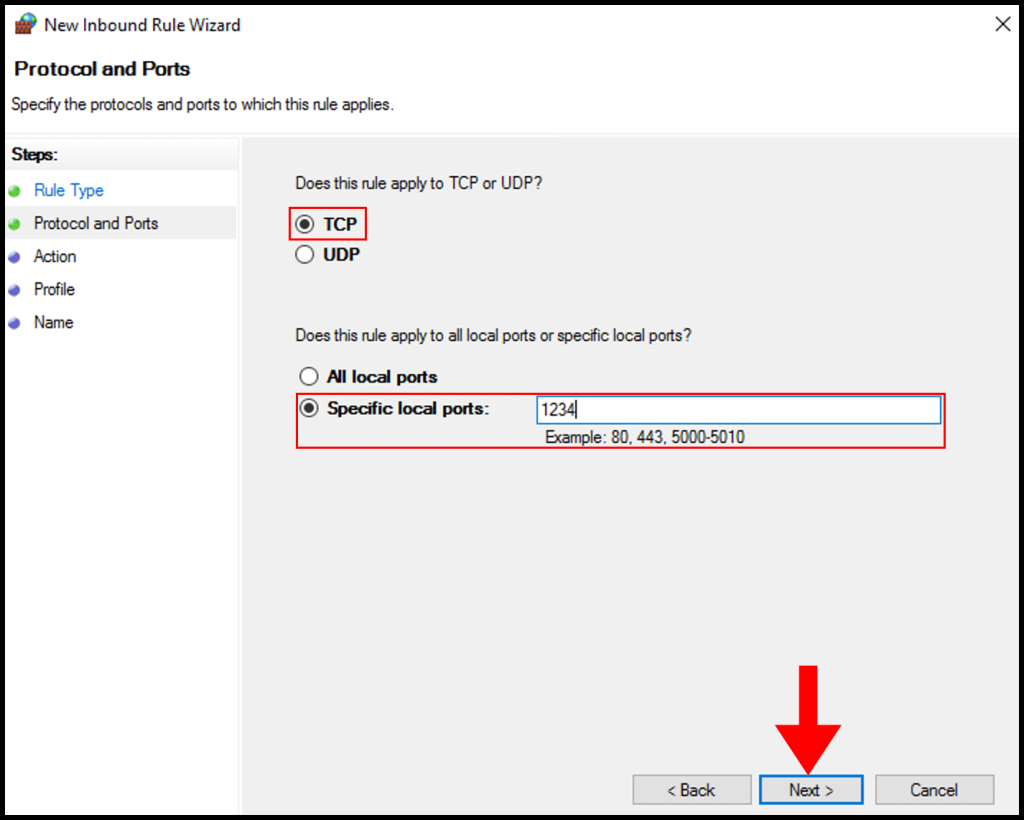
5. In the Protocol and Ports section, select TCP and Specific local ports then enter the port from step 4 in the text box next to Specific local ports.
6. In the Action tab, select Allow the connection or Allow the connection if it is secured and click Next.
Allow the connection: This includes connections that are protected with IPsec as well as those that are not. (Recommended)
Allow the connection if it is secure: This includes only connections that have been authenticated by using IPsec. Connections will e secured using the settings in IPsec properties and rules in the Connection Security Rule node. (For more advanced users)

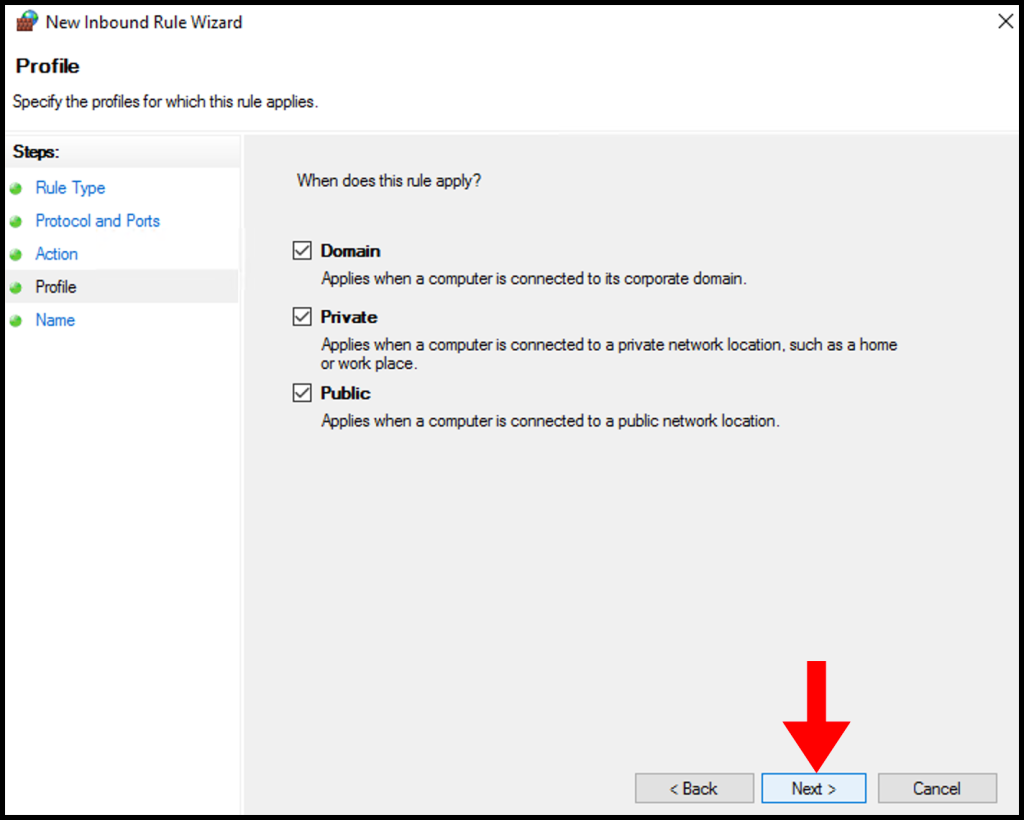
7. In the Profile tab, you need to select all three options and click Next.
8. In the Name section, you need to specify a Name for your inbound role and optionally a description. Click Finish once you are done.
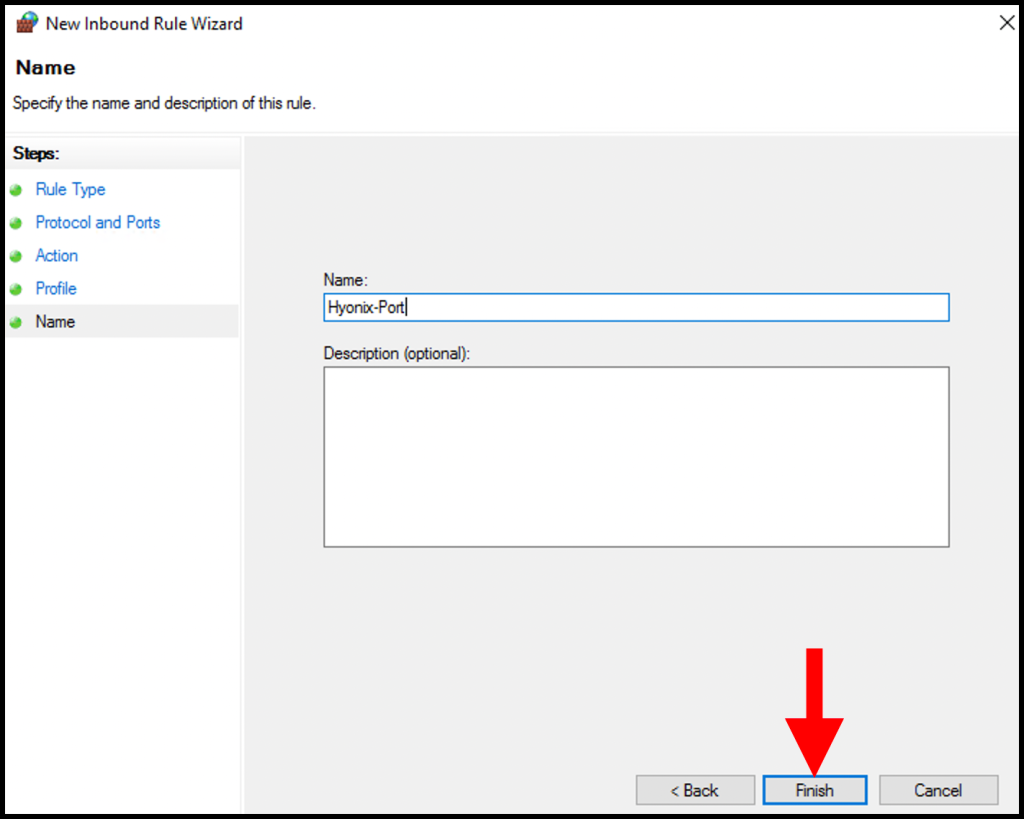
9. Finally, reboot the windows server to implement the changes

10 . After reboot, please try to connect to your server again using IP:Port format (eg: 1.2.3.4:3333 instead of 1.2.3.4) 1.2.3.4 will be your IP and 3333 will be the port you have established.
Step 2.2: Rename Administrator via Security
Windows is one of the most used operating systems used in most personal and enterprise machines. You might be aware that the Windows primary account name is Administrator, you may want to change that to something familiar and easy to remember. In this article, we will be going through how to change the administrator name in Windows.
To perform re-naming administrator, you must have administrator privileges.
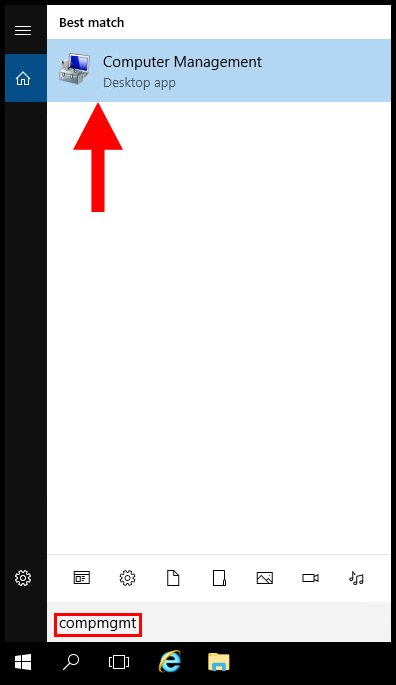
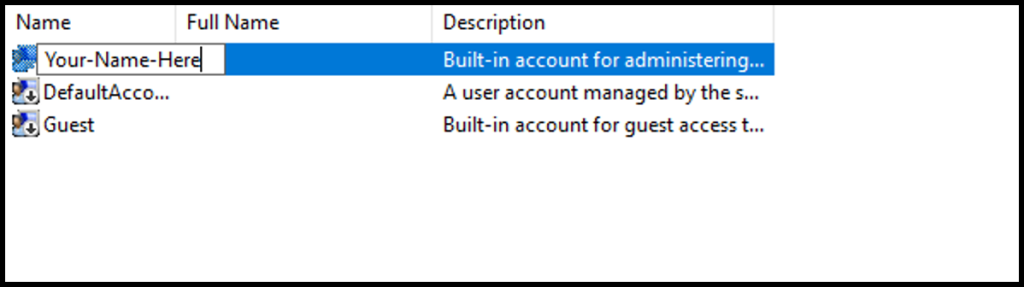
1. To start off, log in to Windows then search and open Computer Management.
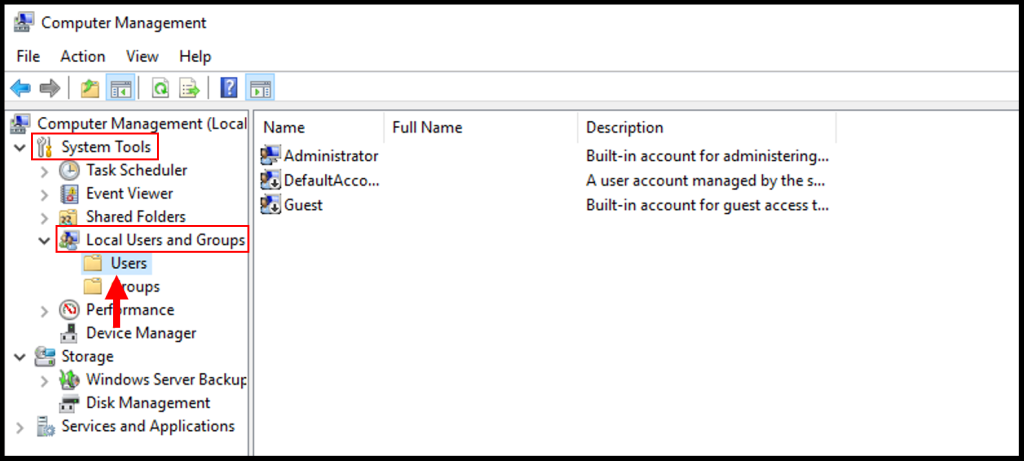
2. Once the Computer Management opens, on the left menu expand System Tools and Local Users and Groups.
3. Then you will see the list of users on the Windows server, right-click Administrator and click Rename to rename the Administrator account.
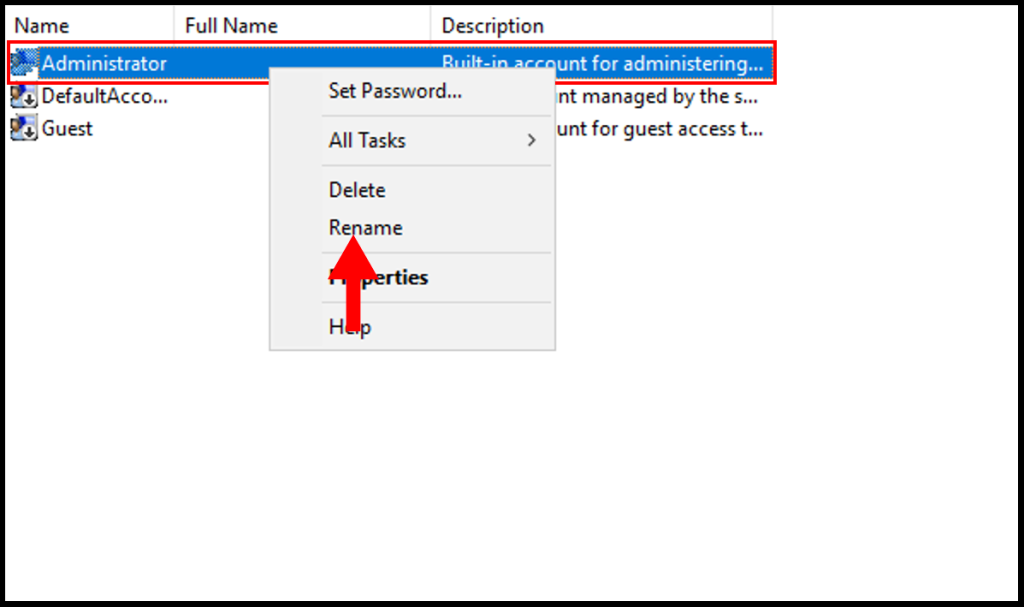
4. Now you may enter your new name for the administrator account.
Step 2.3: Set a strong password
Our default password is already very strong. If you would like to change to your own password, the password must be at least 8 character with at least 1 uppercase, 1 number, and 1 special character. Password that is less than 8 character is reported to be brute forced in less than 60 seconds.
If you would like to change to your own password, please follow these steps
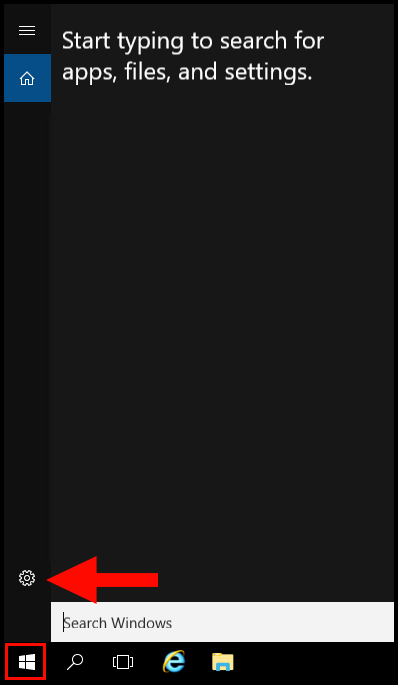
1. First, connect to your Windows VPS. Then navigate to the Windows button and go to the Windows settings by clicking the gear icon.
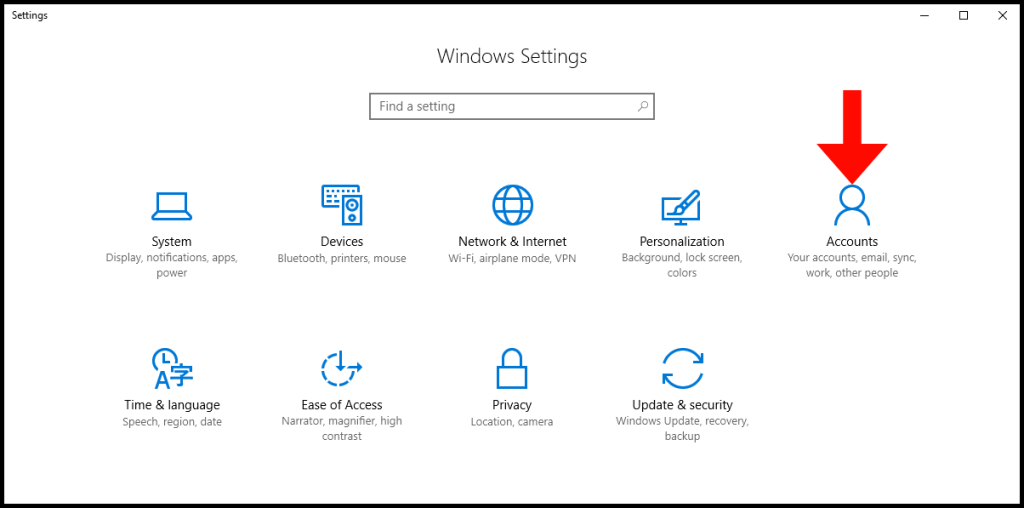
2. Once the Windows Settings window is open, navigate to the Accounts option.
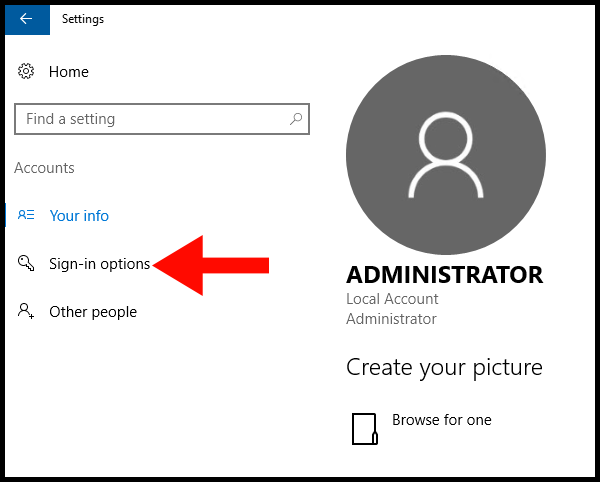
3. Next, on the left-hand menu click Sign-in options to proceed.
4. Under Change your account password, press the button labeled Change.

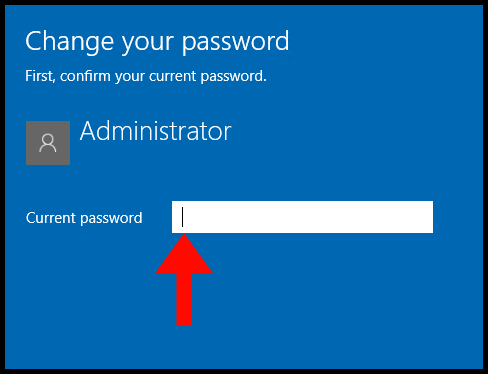
5. Next, type in your current password in the text box.
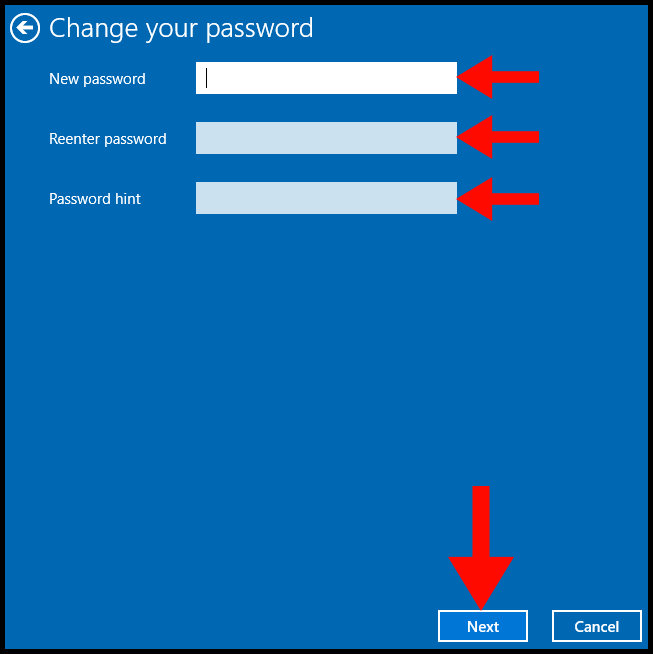
6. Enter the desired password next to New Password and confirm it by reentering it. We recommend putting in a Password Hint, which might save you from forgetting the password. Then, click on Next to continue.
Please make sure the new password will have at least 8 character with at least 1 uppercase, 1 number, and 1 special character
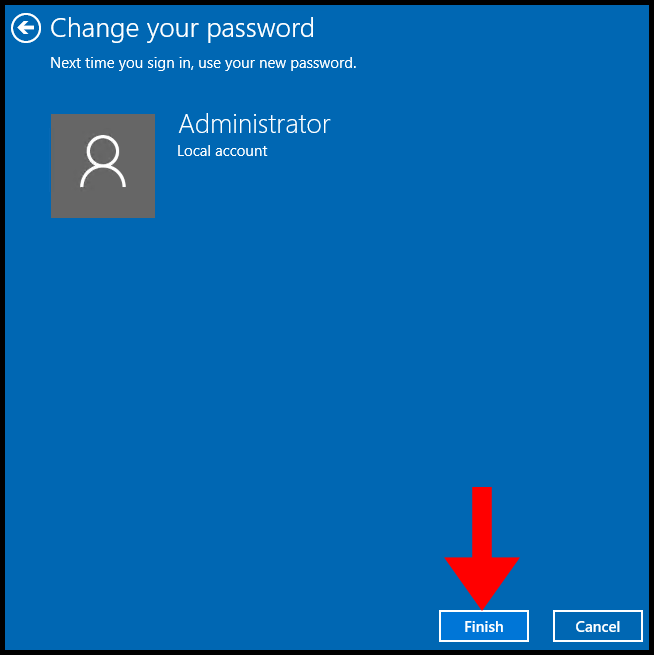
7. Lastly, click on Finish. The next time you sign in, remember to use the new password.
Step 2.4: Enable Two Factor Authentication (2FA) for Windows Server
You can protect your Windows server with an extra layer of security to avoid bad actors from getting their hands on your data. To set up 2FA in the Windows server, we will be using DUO. Duo is the leading authentication service provider on the market. Due to its wide range of free commercial services and reliable security features, it is used by many organizations. In this article, we will go over how to set up two factor authentication (2FA) for Windows server using DUO.
Configure Application in DUO
1. First, register yourself using: https://signup.duo.com/
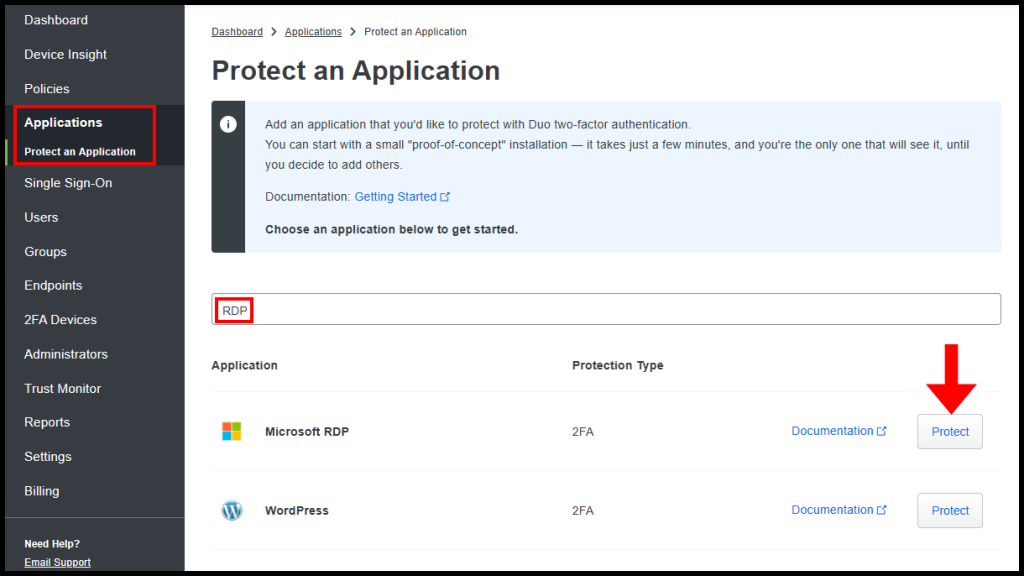
2. On the left menu click Protect an Application and search RDP, then click Protect for Microsoft RDP.
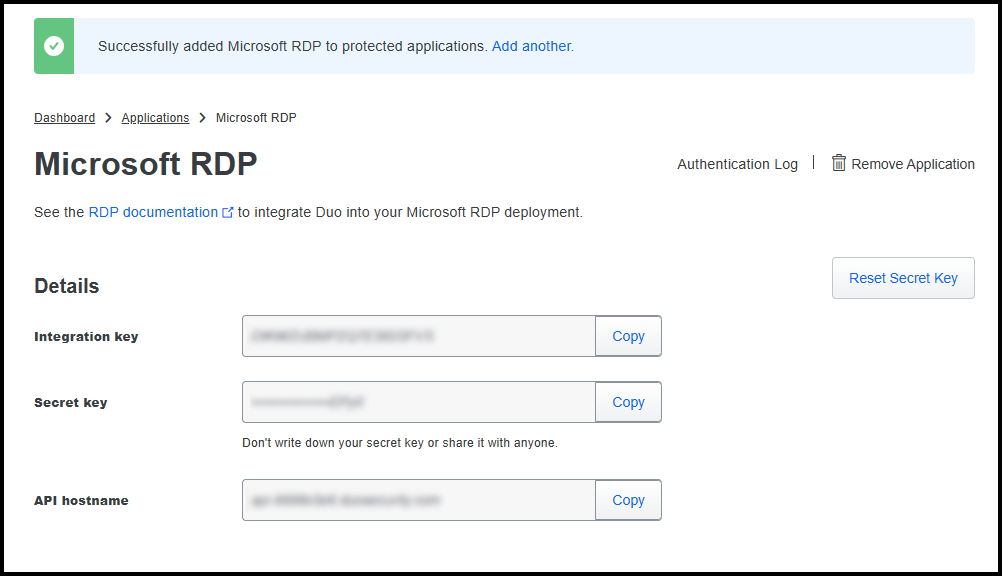
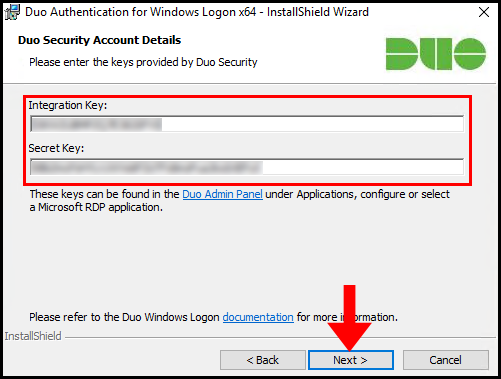
3. Duo will generate the Integration key, Secret key, and API hostname which is needed later.
Install Duo 2FA on Windows Server
Now, you need to install the Duo on the Windows server and set up the 2FA on the Windows server.
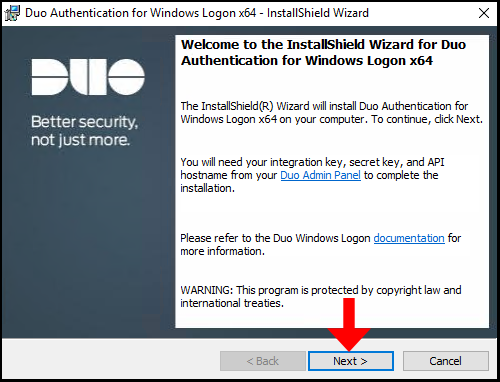
On your Windows Server, download the installer from: https://dl.duosecurity.com/duo-win-login-latest.exe
1. Open the DUO installer and click Next.
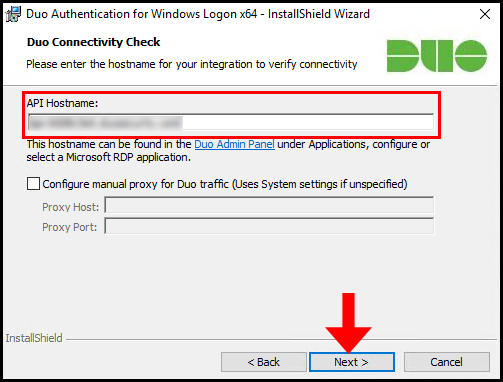
2. Enter the API Hostname we received earlier in the text field under API Hostname and click Next.
3. On the next page, we will need the Integration Key and Secret Key that we received earlier and enter them in their respective text fields. Click Next once done.
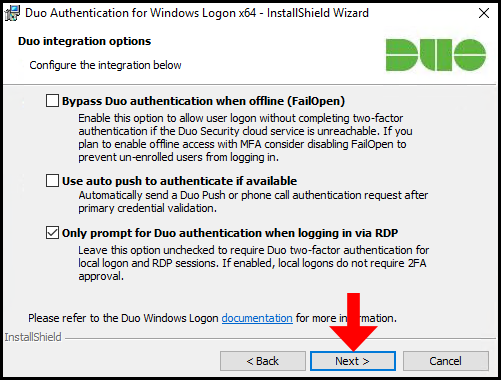
4. Check the required options from the below list,
Bypass Duo authentication when offline: Check this option to allow users to log in without completing two-factor authentication.
If available, use auto push to authenticate: Check this option to send Duo push or phone call once credentials are validated automatically.
Only prompt for Duo authentication when logging in via RDP: Leave this option unchecked to require Duo two-factor authentication for local logon and RDP sessions.
For this article, we will just prompt 2FA at the time of RDP login. Hence we will go ahead with Only prompt for Duo authentication when logging in via RDP. You can choose the options as per your requirements.
5. (Optional) On the next step, you have the option to Enable Smart Card support if your needs require this you can set it up. In this guide, we will not be enabling this option.

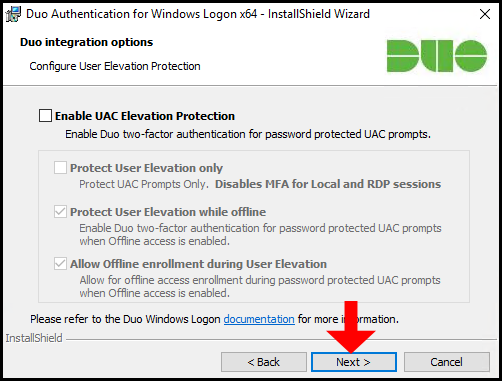
6. (Optional) You can enable Elevation protection to protect password protected UAC prompts. In the case of this guide, we will not be enabling this option click Next to move on.
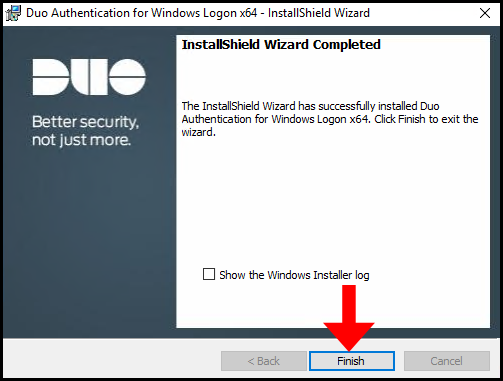
7. Now Duo Authentication is ready to begin installing, click Install to initiate the installation.
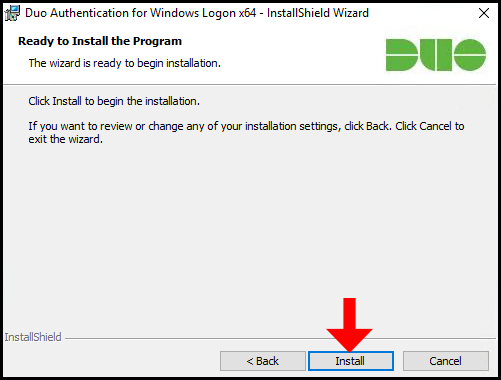
8. Congratulations! You have successfully installed Duo Two Factor Authentication application on windows server. You can click Finish to close out of the window
Enroll Users In Duo
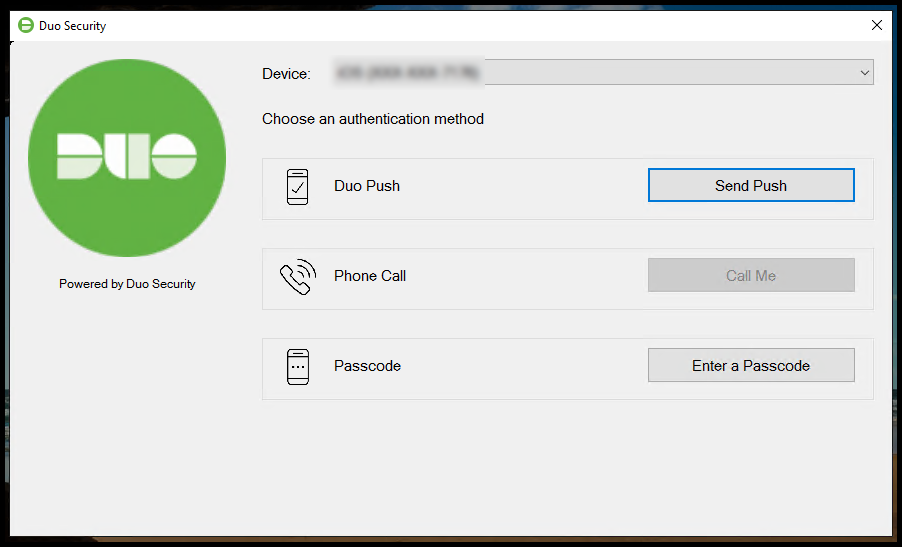
The Duo works on the user configuration and its enrollment in the Duo dashboard. Every RDP server comes with the default user administrator. Here, in this article, we also need to create an administrator user in the Duo and enroll it into the Duo system. If you don’t perform this action, you will end up encountering the following error at the time of RDP login,
USER IS NOT ENROLLED IN DUO SECURITY. CONTACT YOUR LOCAL SYSTEM ADMINISTRATOR.
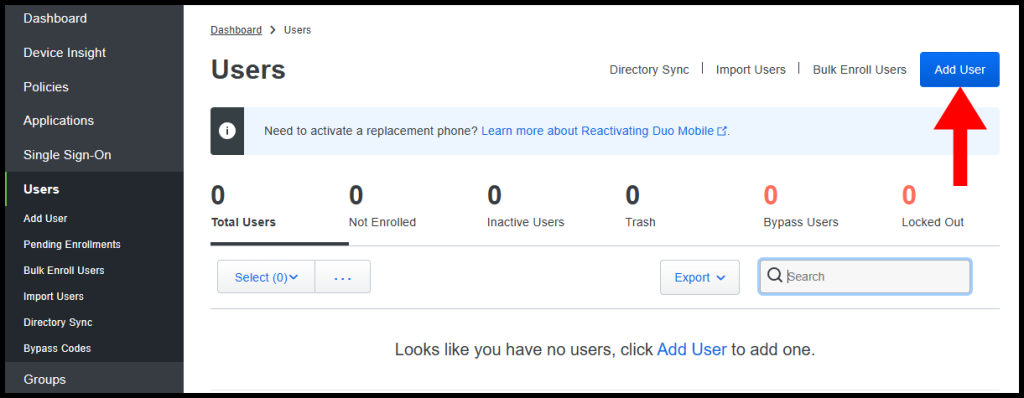
1. In the DUO dashboard, click Users from the menu on the left side and click Add User.
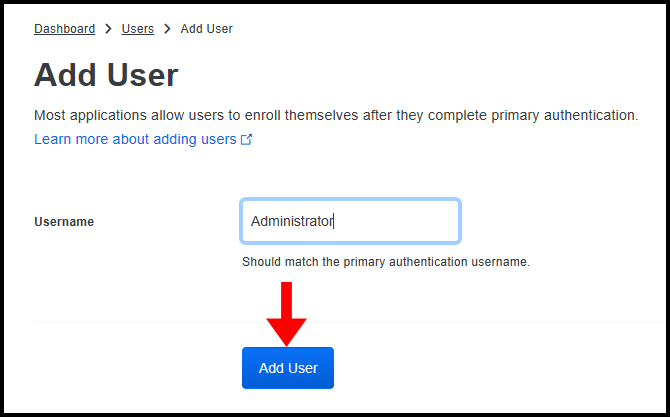
2. Then enter the username which you use to log in to the Windows VPS with, for Hyonix clients the default is Administrator. Once you have entered the username, click Add User to move forward.
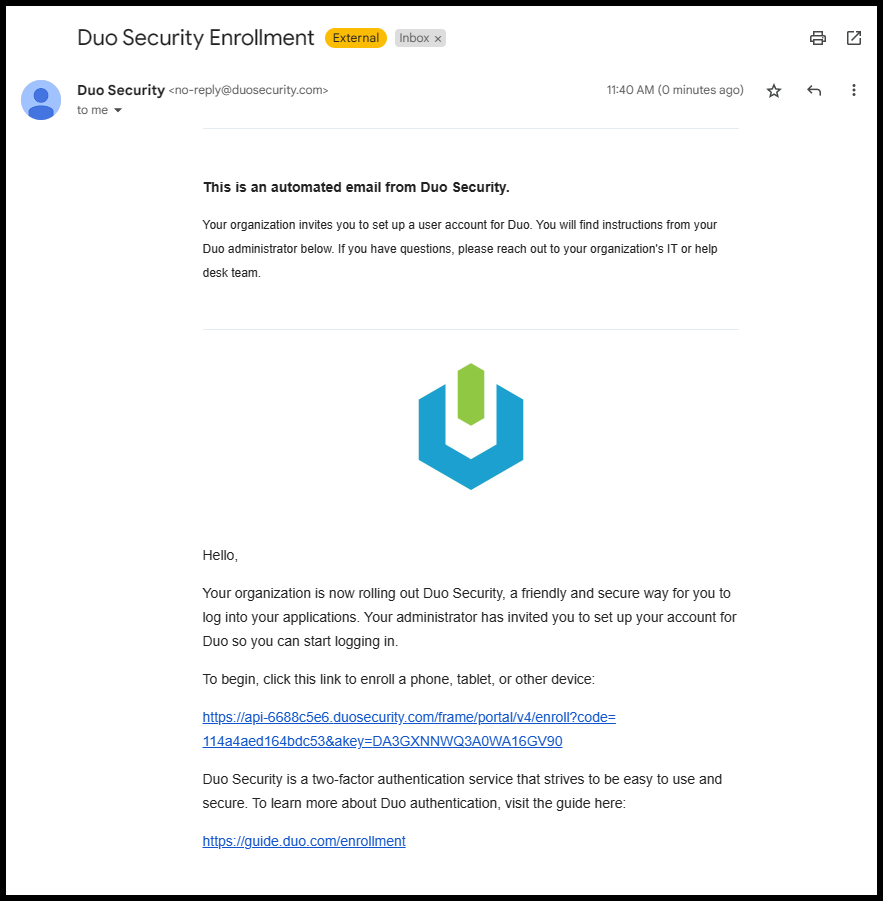
3. Next, enter the required information as seen below and once you are done click Save Changes. And then click Send Enrollment Email.
4. Now go to the email you listed on the previous step and find the Duo Security Enrollment email and follow the instructions.
5. Once you have completed setting up Duo on your mobile device, you will be prompted to do the two-factor authentication whenever logging into your Windows server. We have now successfully setup two-factor authentication (2FA) for Windows Server using DUO.
Step 2.5: Install Windows Defender Antivirus GUI
In the windows server operating systems (2012, 2016, etc) there is no GUI is installed/enabled by default for Windows Defender Antivirus. But, windows offer us options to install/enable the GUI using server manager or Powershell. If the above command turned output as Available for Windows Defender and its add-on modules, you can install it from server manager or Powershell.
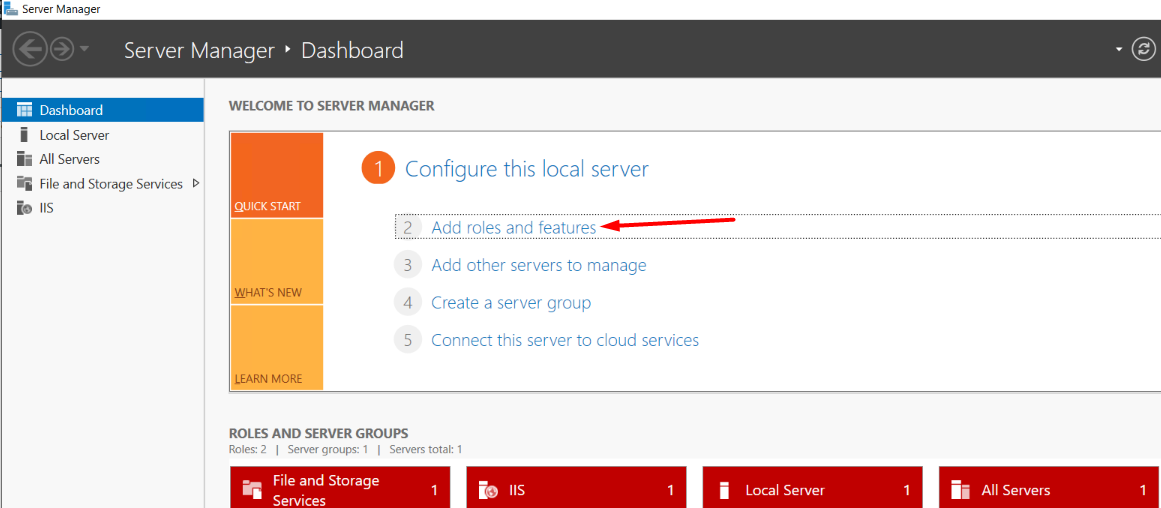
1. Log in to your Windows Server 2012, 2016, or later → Open Server Manager.
2. Click on “Add Roles and Features“.
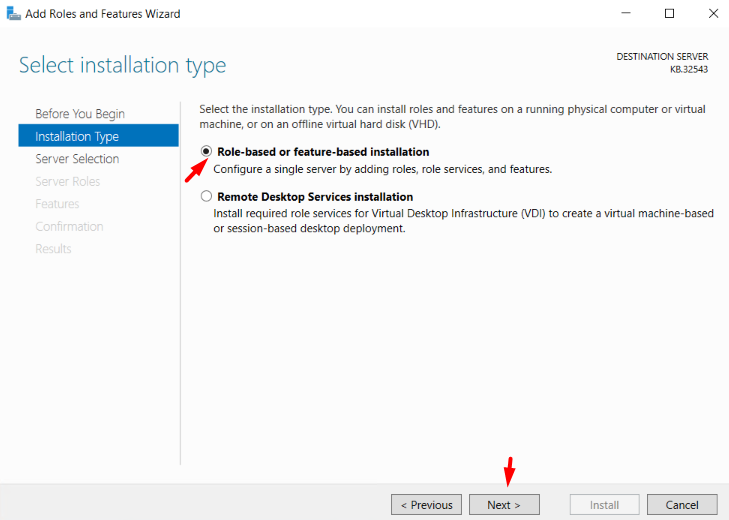
3. In the Installation Type section, select Role-based or feature-based installation → Next.
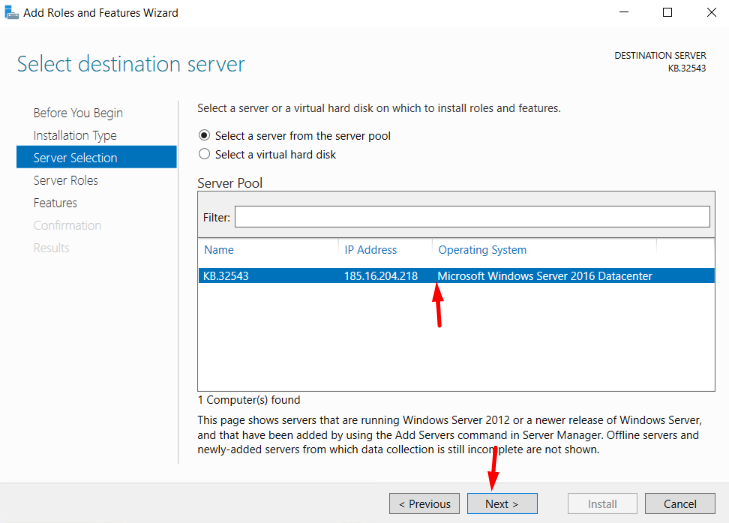
4. In Server Selection, select your Windows Server, if your server is configured in the network, then select the particular server from the list to process the installation → Next.
5. Do not select or Deselect anything in Server Roles Section → Click Next
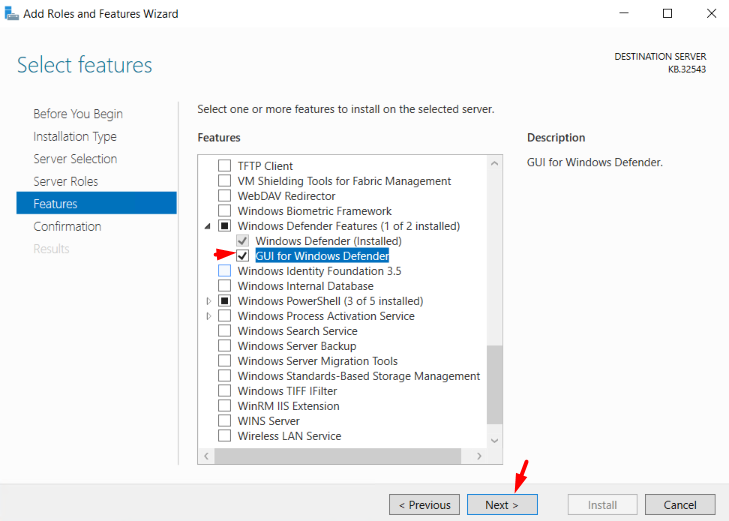
6. In the Feature Section, click on GUI for Windows Defender as well as Windows Defender (If it is not installed) from under Windows Defender Features.
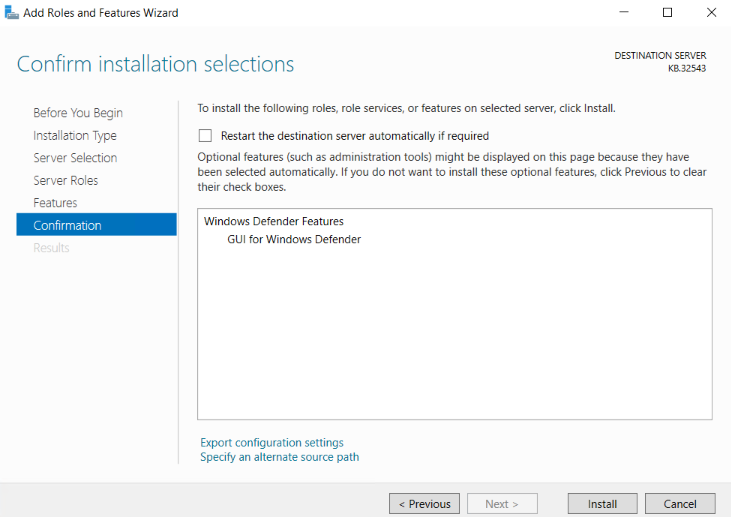
7. In the Confirmation section, click on Install.
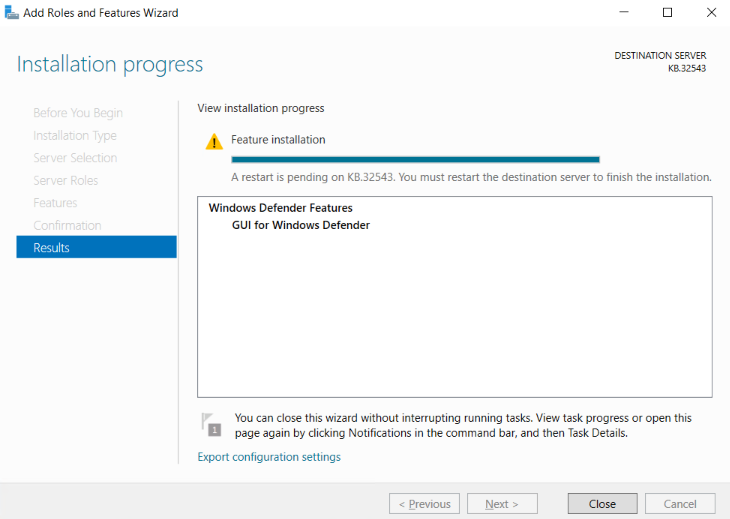
You must restart the destination server to finish the installation.