If your server keeps crashing, freezing or the application doesn’t respond as expected, you might have a problem with the computer memory (RAM).
One of the easiest and the most straightforward solution to troubleshoot the issue is to use the a pre-installed Windows tool called “Windows Memory Diagnostic” to perform test and check out potential errors related to memory.
In this tutorial, we will demonstrate the process on a Hyonix virtual private server.
Navigate to the Tool.
To get started, log in to Windows Virtual Machine/Server using RDP, and search for the Windows Memory Diagnostic Tool. (Also, you can use the “mdsched” term in the search bar). Right-click on the “Windows Memory Diagnostic Tool” and click on “Run as administrator”.
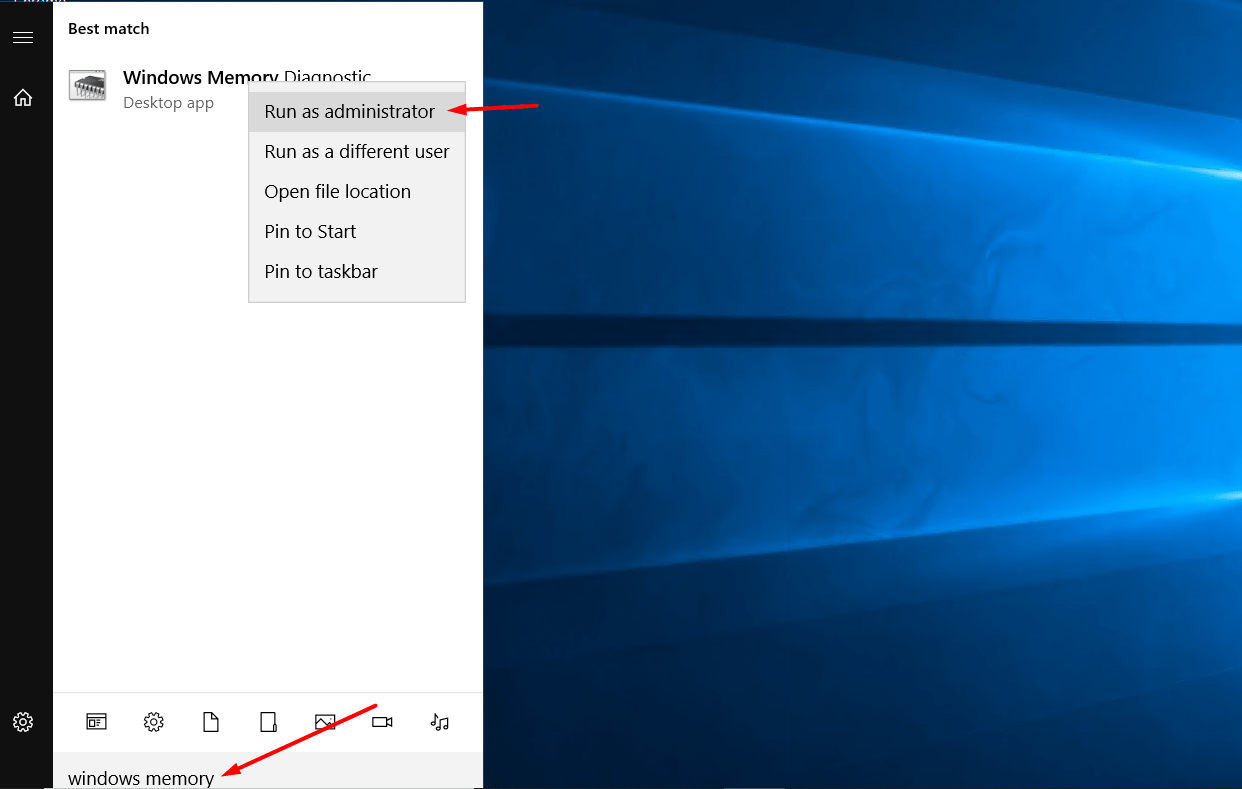
Get Started With The Tool.
Next, you can find two options,
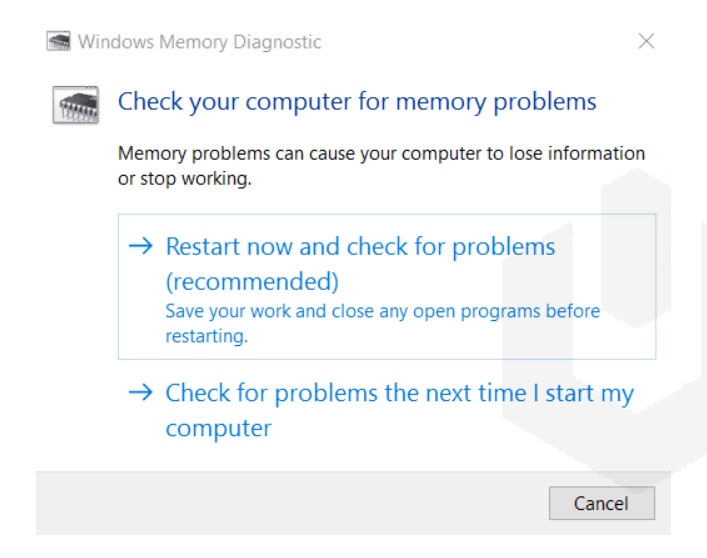
1) Restart now and check for problems.
This option will immediately restart the server and prompt to Windows Memory Diagnostic Tool interface after the system boots.
2) Check for problems the next time I start my computer.
If you are working on something but can wait until restart to troubleshoot the problem, then you can go ahead with this option.
Now, if you are using a Virtual Private Server, you will need to access the Console/VNC.
If you are a customer of Hyonix.com, then follow this article – How to access the Server Console?
Diagnosing The Problem.
If you select the “Restart now and check for problems” option, then your server will be restarted automatically.
After booting the server, you will prompt to Windows Memory Diagnostic Tool interface. By default, the Windows Memory Diagnostic Tool will run through the Standard Mode, which is most effective for most problems.

Also, you can customize the operation of the tool by pressing F1.
Configurable Options (Advanced).
A) Test Mix.

– Basic Mode.
This mode runs MATS+, INVC, and SCHCKR (cache enabled) tests.
– Standard Mode (default).
This mode runs MATS+, INVC, SCHCKR (cache enabled), LRAND, Stride6 (cache enabled), CHCKR3, WMATS+, and WINVC tests.
– Extended Mode.
This mode runs MATS+, INVC, and SCHCKR (cache enabled), LRAND, Stride6 (cache enabled), CHCKR3, WMATS+, WINVC, MATS+ (cache disabled), Stride38, WSCHCKR, WStride-6, CHCKR4, WCHCKR3, ERAND, Stride6 (cache disabled), and CHCKR8.
B) Cache.

If this option is set to turn on, it will allow Windows Memory Diagnostic Tool to access the data in cache. If this option is turned off, Windows Memory Diagnostic Tool will access the data in RAM directly to ensure completion of the test. Default this option is enabled.
C) Pass Count.

This option is to set a number of times the scan will be repeated to test the server’s memory/memory module.
Once you are done with the configuration, press the F10 to go back to the main page. Again, the scan will restart automatically and runs according to the selected configuration option.
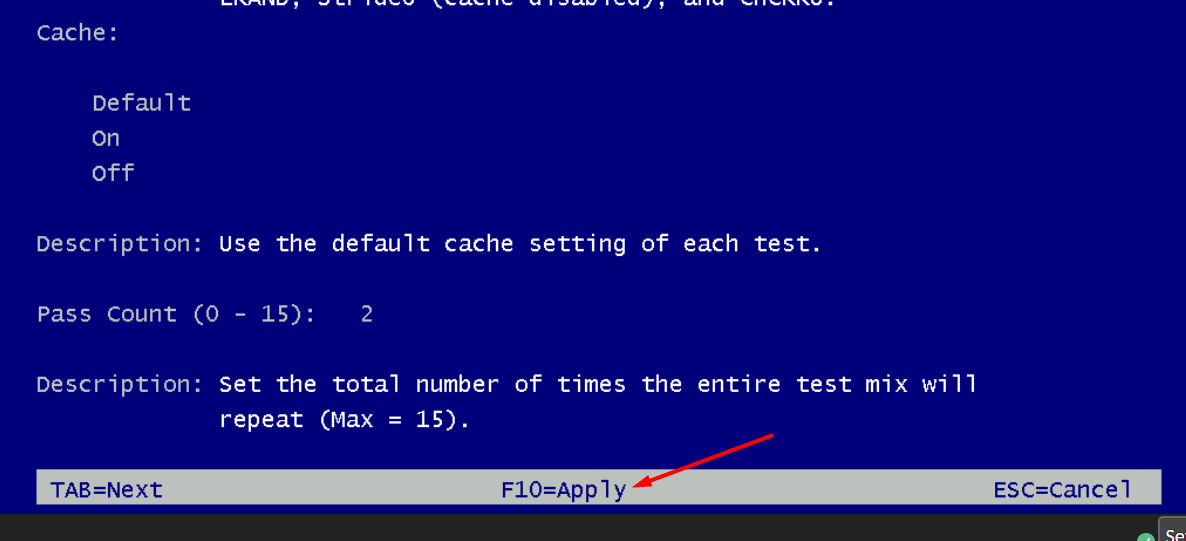
This process will take several minutes, and after that, your server will be booted normally.

Checking The Results.
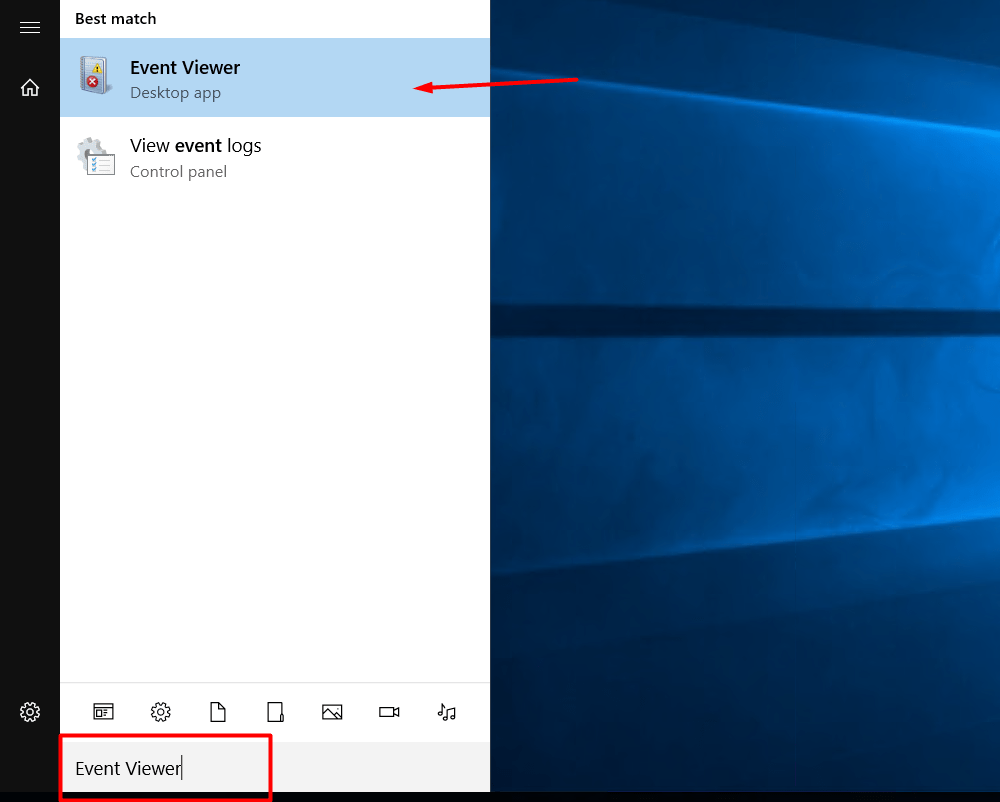
Now, to view the diagnosis results, you can take the help of “Event Viewer“.
1. Log in to Windows Virtual Machine (RDP), and search for the “Event Viewer” or “eventvwr.exe”.
2. Expand the “Windows Logs” directory.
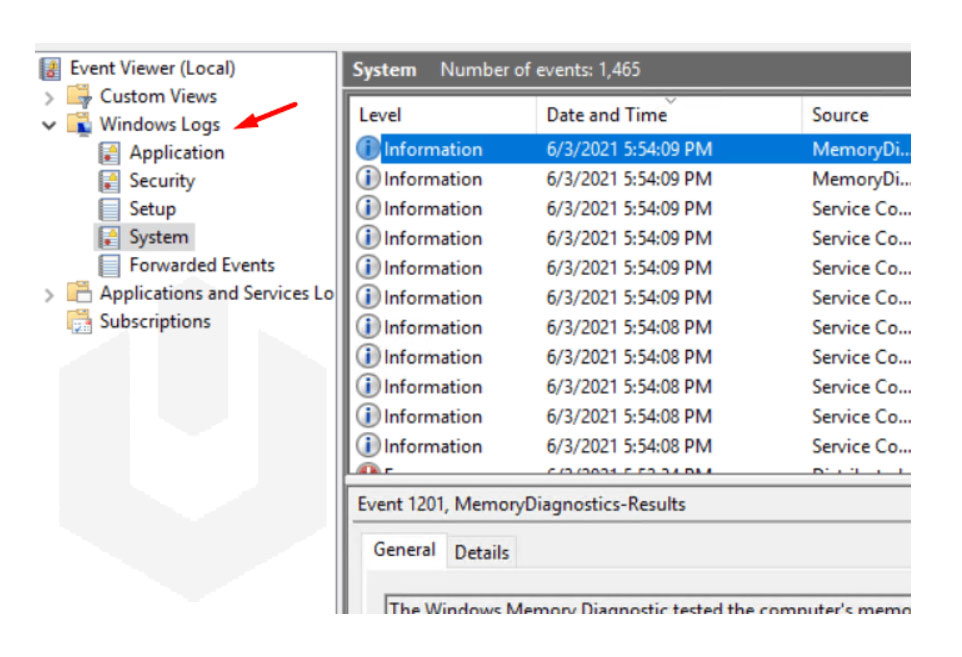
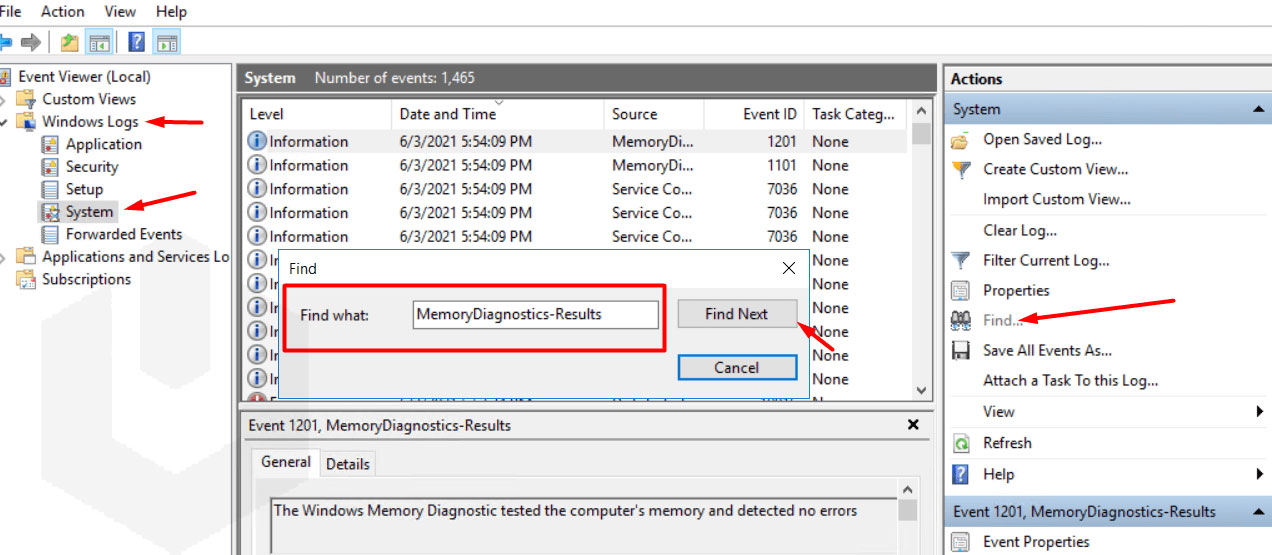
3. Right-click on System and click on Find.
4. Search for “MemoryDiagnostics-Results” and click on “Find Next”.
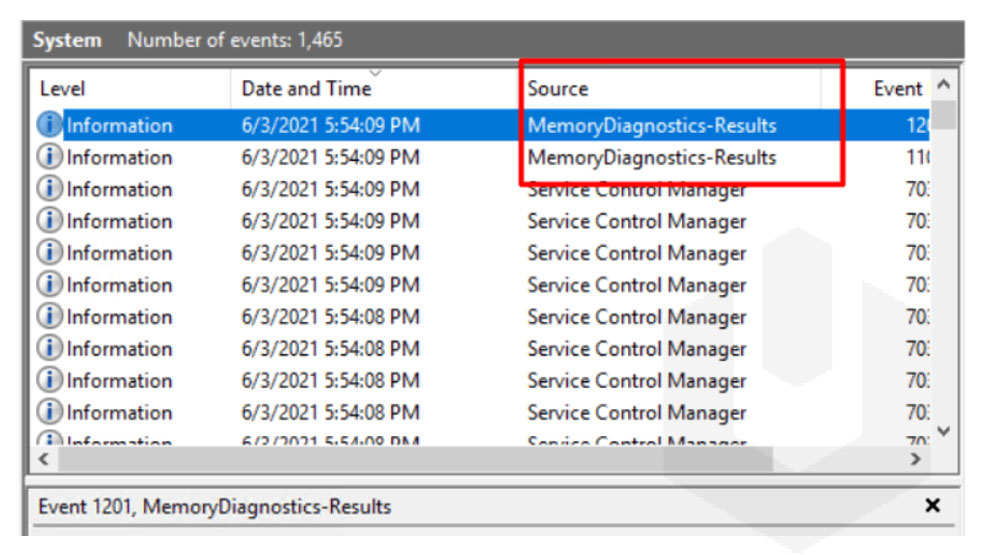
5. You can find the latest results on top, now double-click on the “MemoryDiagnostics-Results”.
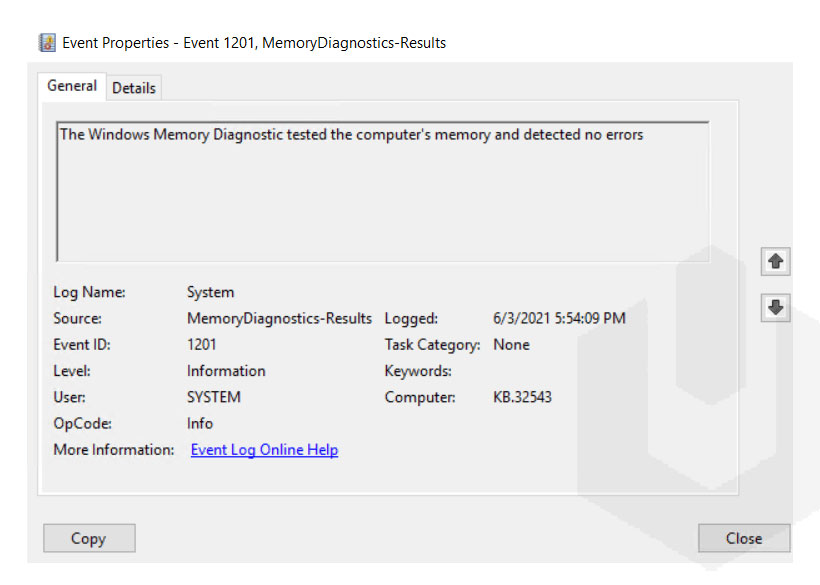
6. If you find “The Windows Memory Diagnostic tested the computer’s memory and detected no errors” in the “General Dialogue Box,” then you are not having any problem with the memory.
Errors & Conclusions.
- If the test detected no errors and you are still facing errors, your RAM is likely not the cause of the issue you are facing. However, you can perform a more advanced test (using Extended, Cache On, and higher Pass Count) for a more accurate result.
- If the test resulted in errors, The message will mention which RAM module has the actual problem. However, if it’s unable to grab that information during the test, you will need to use Memtest86 to re-check again, or manually removing RAM module one by one until the result came clear.
